Virtual gallery reflection

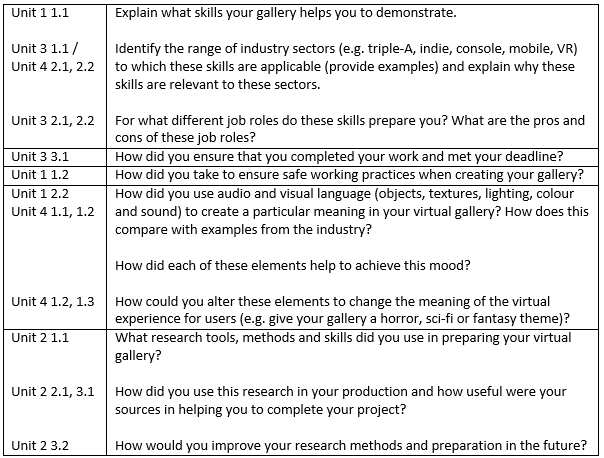
Here is my reflection on my virtual gallery I built recently, I answered the questions that we were given for each Unit. Here are the questions for the virtual gallery reflection:

reflection table

Unit 1 1.1: 

The virtual gallery helps me display my skills, the skills it includes are 3D modelling skills, Photoshop skills, audacity and audio producing skills, my Adobe priemier skills and syncing skills, my programming skills. It also displays my lighting skills and manipulating how it works, my animation skills, creating textures and applying them, my scripting skills and my Unreal engine skills.

Unit 3 1.1/ Unit 4 2.1, 2.2: 

There are many industry sectors that the skills used in making virtual gallery can be applied to such as mobile gaming like the IPhone, console gaming like Xbox one, advertising and games for VR like the Oculus Rift, Google Box VR. This is because all the skills and technologies converge with the companies as all of them use 3D modelling, animation, Photoshop, audacity and recording audio, Adobe preimier, lighting and texturing, the only one that might not use unreal is advertising.

Unit 3 2.1, 2.2: 

These skills prepare us for job roles like a 3D modeller, a job that involves texturing, a sound engineer and a video editor. Here are the pros and cons of the job roles:

Pros: 

They all have creative freedom in there work, allowing a creative person to explore more and create things under their own influences. This makes them feel more free in what they do, making them feel happier.

When they finish a piece of work, it can make them feel very accomplished and proud in what they have made, whether it took them a day, week or month, this makes work very rewarding.

Cons: 

They all involve long periods of sitting down which can cause health problems in the future if the employee didn’t get any excise or if the employee doesn’t take quick breaks from the computer.

Some of the pieces of work they create might be rejected by the employer or the main leader in the production of the product. This can leave the employee feel very disappointed about creating something they put a lot of work into not being used.

Unit 3 3.1: 

I kept myself organised which saves time, I did this by priortizing the improtant work that needed to be done and then doing work that I can do at home or work that was not a major priority for the gallery. To give you an example of this, I made all the 3D models and textures for them and place them in the gallery first as it was the most important piece, then I started making a 3D model for the voiceover, which was less important.

I also organised my work by making folders appropriately named for each type of work I did for the project, such as I made a folder called textures to hold all the textures for the virtual gallery and made a separate folder called 3D models and placed all the 3D models in that folder. This way I could easily find the files I need without wasting time, this allowed me to meet my deadline.

Unit 1 1.2: 

I took regular breaks to ensure that I am not straining my eyes, they were about 10 minutes long, long enough to allow my eyes to rest and short enough to allow more time on my work. I also kept a good posture by having the chair kept straight and also had the computer at eye level and I kept drink and food away from the computers as it is a hazard. I was also careful of cables in case I tripped, I did not overload plugs and I kept myself hydrated.

Unit 1 2.2:

I used low lighting in the cinema to make it similar to real life cinemas which is to allow the viewer to focus more on the video and I made the galleries bright again like real life which is to present the work clearly to viewers. I used music in each room to give each room a emotion, like in the photography room and 2D room I used a piano music to make it calm and relaxed when viewing the work. Whilst the 3D room I gave it sci-fi music, because 3D modelling is sort of futuristic and seems high tech, making the viewer feel curious as it seems out of this world.

Unit 4 1.1, 1.2:

The texturing helped to give it the right mood, such as the Photography room’ walls will be a white smooth plaster and the floor would be a wood planked floor, this would keep it calm as its not full of so many colours to dazzle, it is only there to present. The cinema however is red and quite dark, making the mood feel excited but also comfortable and relaxing because of the carpet and leather.

The lighting creates a mood also, like in the cinema it is dark, but has a bight screen, making the view again relaxed as it feels like they are watching a movie, whilst the photography room and 2D room use bright lighting to help the viewer to focus, making the mood more calm and focused.

Unit 4 1.2, 1.3:

Ambient music can be used to alter the element to change the meaning of the virtual experience for viewer, this is because you can change the music in the cinema to be violins on high notes and dong short burst, this would make the cinema seem to be horror themed.

Unit 2 1.1:

I used mood boards to get an idea of the mood I wanted for each room, a mood board is secondary and primary research. I also looked in a gallery in Canterbury which is called the Binary museum and have been in cinemas, this would be primary research and I looked for textures and sounds for each room which would be secondary research.

Unit 2 2.1, 3.1:

I was able to get a better understanding of how galleries and cinemas are designed to look and feel which really help me understand what I wanted. I was able to plan what I wanted for each room from the mood boards, this helped me to get on with my work and not slow down or have to think for a what I wanted. I was also able to get all the resources I needed for textures and sound as I had already did research on what sounds and textures I wanted, this way I didn’t have to waste time in finding sounds and textures when I need them.

Unit 2 3.2:

I think I should have gone to more galleries than one, so I could get more ideas in galleries and I should also go to a cinema and pay more attention to what they use to create a mood. I should also get my textures and sounds downloaded and prepared to be used before beginning to work on the gallery, this would save a lot more time for me.

Here is a Link to a recorded guide throughout the virtual gallery I made: http://youtu.be/UdIv2dbobZg

My overall evaluation

My virtual gallery went very well, each room had all my work in it, placed in a well organised manner, each voice over for the introduction of each room was done very well along with the voice overs for each object. The improvements I could make on this gallery is finish adding the rest of the voice overs on each object and the texturing could have gone better if I took more time in it and I should have done more research into it.
Unit 2- Applying research tools and methods to drawing

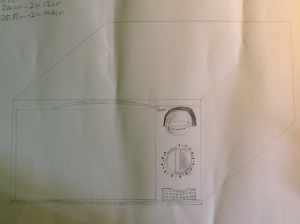
The first task I was given was to draw one of my appliances from home, only using my memory. We did this because we were learning about the different types of drawing techniques, such as drawing from memory and drawing from a picture.

There were only two obstacles I faced, first was picking the appliance I could remember the best, which was the microwave and second was remembering the little details on the microwave such as the number and shapes on the dials. The scale was definitely not correct, the measurements had no relation to the actual microwave but the microwave did have the right shape when comparing it to the real thing. The positioning of the features of the microwave was very accurate compared to the real microwave, the dials seemed to be placed right and the button on the bottom right of the microwave is there.

When comparing the drawing from memory and the actual microwave they are very similar, but only a few features are missing from the drawing, such as the measurements on the dial and the lines on the bottom and top of the microwave.

image

image

When researching the actual size of the microwave, I used a measuring tape and wrote down the size of the microwave, I used my Ipad to take a photo. After doing so, took the picture and measurements and redid the microwave, since I didn’t have such a good camera, I wasn’t able to capture the microwave in full detail but I was able to get some detail down more than when I did it from memory. The shape and size of the microwave were accurate but the top dial was too high as I could not add any of the writing on it, this probably because the dials might have been too big and may be a bit too spread out. Next I shall measure the dials as well, along with measuring the where the dials are placed, that way I can draw the microwave more accurately.

image

To create these two drawings I used a ruler, a pencil, a rubber and then used a ipad camera and measuring tape to get a picture and the measurements of the microwave, to create the first drawing I used my memory to create the scale and the main features of the microwave. I also used my sense of perspective to make the microwave look the create size at an angle, I used shading to make it look more 3D and used my memory again to add any little details in. When creating the second image I first made the measurements much smaller than the microwave was so I could fit it on the page, then used the measurements and a ruler to create a box at an angle, I then used the picture to accurately place the dials and other features in the right place.

Evaluation

Out of both the drawings I prefer the first drawing, the one we had to use memory for, this is because I did not angle the second drawing’s lines properly, instead of the width of the microwave slightly shrinking as more distance is gained, I angled it so it would stay the same, It would work if I had the front slightly angled but it is not.

I do not think it is cheating using measurements and pictures to make the second picture as they are merely tools and the painter has to use his own initiative when placing them and using them, unlike on the documentary “Tim’s Vermeer”, Tim’s device as I believe is cheating as the painter only needs to copy from what he sees and does not need to use his own initiative when using the tool.

Unit 2- 1.1/2.1- Visual notes

For this task, I had to take down notes from watching Tim’s Vermeer documentary, here are my notes and what I have learnt. 

We first learn that Tim is a very creative man and wants to explore how Vermeer made such stunning art and wants to recreate the process as well. So he researches on art and the tools they used.

I have learnt that all art has been improved through improvement of the artists tools. For example the camera obscure which is a dark room with a small hole in one of the walls, this hole projects an upside down image of what is outside onto the inside of the dark room. I also learnt that the image can be change by changing the lens so it is brighter and changing the position of the wall with the hole in it will change the size of the image. Such as if the wall with the hole was further away from the opposite wall, the image would be small and if the wall with hole was closer to the opposite wall, it would be bigger. We also learn that human eyes compress light, which means that some of the light detail is lost, that’s why a camera absorbs more light and can tell the difference to light much better than a human.

image

Source of image: http://pixsylated.com/blog/stepping-inside-havana-camera-obscura/

Tim considered the camera obscurer but relised that it is nearly impossible to use as getting the right colours for the painting is very hard as the image projecting on the wall can make the same colour of paint look darker, whilst as White is the only colour that matches every colour.

Tim then was able to figure out another way of using the the camera obscurer, by using a small mirror facing towards an upside down image, he look at the image through the mirror as if it was on the paper. To change the position of the image on the mirror, all he had to do was to change his perspective towards the mirror.

image

Source of image: http://pokeysponderings.com/tag/tim-jenison/

This worked with close up images but as Tim relised, using it with the camera obscurer would be a problem as he noticed that some of the details were too small to come through the obscurer, where as on the painting he is trying to recreate, the details were perfect and there. Tim figures out another way of doing the mirror idea by using another mirror to replace where the camera obscurer would project, this way the image is enhanced and in greater detail. There is only one flaw to this device, it causes the image to bend slightly.

In the end of the documentary, Tim is able to recreate the painting with some slight improvements knowing that image bends slightly.

My thoughts 

I think the way that Tim painted the painting was cheating, now you can argue it is just another tool for painting, like rulers and protractors but it’s the combination of using the tools and the painters initiative of placing them in the right place to create a piece of art. This is why the way Tim’s device works does not count as genuine art, this is because the painter does not need to use initiative when using Tim’s device as all you need to do is copy and use the right colours, like using the instruction sheet when building Lego, you built it but you didn’t create it.

Unit 2-3.1+3.2- Reflecting on feedback

Reflecting on feedback:

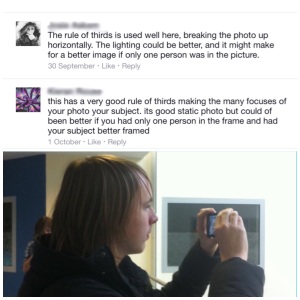
On Wednesday I took some pictures for the course to learn about photography and received feedback on some of the photos which I shall now reflect on. We did these tasks so we could learn how to give critical feedback to each other and how to use the the feedback we have received to improve our work.

caf-pic-feedback with blur

image

image

After the feedback I have received from Facebook, I will now take more pictures with more people walking through, making it more dynamic. Also for my pictures I should try to keep out things that would ruin the composition, such as for my abstract picture I could try to point the camera more towards the building and trying to keep the ceiling out of the picture as best as I can. I have also learned that to make a better portrait, I should try to keep it only one person in the picture, so that it is more focused on that one person I want to capture.

what type of research:

I believe that this type of research is primary as primary counts as surveys, questionnaires and interaction with people. This would allow feedback to be primary research as it is a form on interaction with people. It would also count as a qualitative as these are personal responses from people, which is what qualitative means.

Effectiveness of Facebook:

Facebook is a very good tool for research as it allows everyone in the classroom and teachers to give feedback on photos that we have taken. This allows you to easily improve your work by using the feedback and if you ever forget what you need to improve, you can always check again as it stays up on Facebook.

Is social media a good way to promote your work? 

I believe social media is a good way to promote your work as it is capable of spreading very fast and becoming popular, you can also use the feedback you get from promoting, allowing your work to be able to improve.